Computer Systems
 | Terminals Selection: |
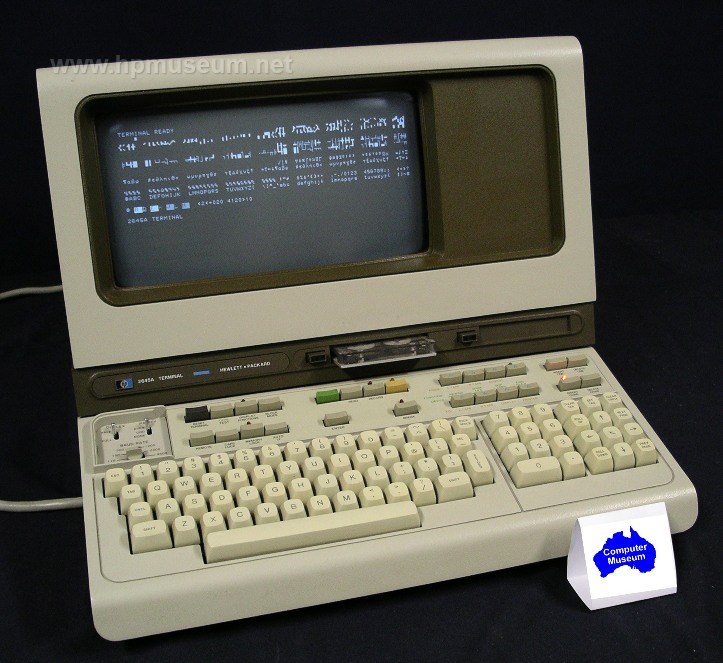
| Name: 2640A | |
| Product Number: 2640A | |
| Introduced: 1974 | |
| Division: Data Systems, Data Terminals | |
| Ad: Click to see, Click to see, Click to see, Click to see | |
| Original Price: $3500 | |
| Catalog Reference: 1976, page 534 | |
| Donated by: Luke Roy (2645A), HP Australia. |
Description:
The 2640A was the first of the 264X terminals from HP. Like the 2615A, it displayed 25 lines of text (80 columns) on its five by ten inch rectangular screen. The resolution of the character cell was 7 x 9 dots. The 264X terminals had detachable keyboards.
The 2640A was successful from the very beginning. In December of 1974, HP received 151 orders valued at $500,000, about eight percent ot the total value of orders received by all of the Data Systems Division that month. HP received 317 orders for the 2640A the following month, accounting for twenty percent of the division's total business. HP shipped 3000 of the 2640A terminals in the first year.
The 2644A was introduced in 1975 for $5000 and included two mini cartridge tape drives. The 2644A was replaced by the 2645A ($3,500 without tape drives, $5,100 with two tape drives) in 1976. The 2645A was the most common of the 264X terminals.
The 2641A APL/ASCII terminal was introduced in November of 1976 and priced at $4,100. The 2645R was introduced in April of 1977. The 2645R included Arabic characters and was priced at $4,350 (without tape drives).
The 2649A was introduced in 1977, priced at $2150. The 2649A was programmable and much like a personal computer, although it omitted the tape drives. The 10,000th 264X terminal was shipped in April of 1977. The 2648A was introduced in July of 1977 for $5500 and added graphics capability to the 264X terminal series. Graphics mode provided a resolution of 360 by 720 dots. The 15,000th 264X terminal was shipped in October of 1977.
The 2647A was BASIC programmable and introduced in May of 1978. Priced at $8,300, it included the dual tape drives and had graphics capability.
The 2649D was designed specifically for use with HP 250 computer systems. The 2649D and 2622D are the terminals that can be used to boot the pedestal version of the 250.
The 2642A was introduced in 1980 and priced at $6,750. The 2642A was compatible with the 2645A and came with a 5.25-inch floppy disc drive.
The 2647F was introduced in June of 1982, priced at $9,950. This graphics terminal included a 5.25-inch floppy disc drive along with BASIC and AUTOPLOT software.
The 264X terminals were very successful for HP. By the middle of 1981, HP had shipped over 60,000 units. The 2640 was the highest ranked terminal in a Data Decisions May 1981 survey of terminal users.
Sales of 264X terminals were affected by the introduction of the 262X terminals beginning in 1979. The 264X terminals lasted another five years. Most were obsoleted in January of 1985 (although the 2647 continued on as a 3000 system console).
The 2645A was also a movie star. It made an appearance in the 1976 movie The Casandra Crossing.
There were also OEM versions of the 264X series - the 2649B was the OEM version of the 2645A, the 2649C is the same as the 2648A and the 2649G was the same as the 2647A.
The 2640A and 2644A can also be used to play games by loading in custom developed game files. See the '264X games' zip file in the Product Documentation link below for a sample game from the Computer Museum at Stuttgart University in Germany.
For a detailed tutorial on restoring the optional tape drives and tapes for these terminals, be sure to visit the hp9845.net site. Here.
Collector's Notes:
264X terminals are still fairly common, but they are getting very old. As of 2018, most of the units we see are in working order, with problems due to the multitude of connectors for the boards and the IC sockets creating intermittent connections resulting in blinking screens, a screen full of 'nulls", I/O Error 7 and an inability to perform a self test. The recommended approach to fix this is to remove all the boards and clean the edge connectors (top, bottom and rear as appropriate) with contact cleaner. We also flush the motherboard and top plane sockets with contact cleaner. This usually restores functionality to the units, with a bit of additional jiggling and repeat cleaning often needed to make them reliable.
Power supplies have been known to fail as well. The power supplies in these units contains large electrolytic capacitors. These capacitors have a tendency to dry out after prolonged periods of not being used. Sometimes, they can also leak. The drying out problem is usually curable. If you come accross one of these terminals that hasn't been switched on for awhile, DON'T apply direct mains power to it! This is a good rule of thumb for most electronic equipment that hasn't been used in awhile. If the terminal was working the last time it was switched off, then it will probably work when you turn it on, provided you apply power properly. Do this by applying voltage slowly (using a variac). So, run the machine at a quarter of the mains voltage for two hours, then half of the mains voltage for another two hours. Then, let it rest for awhile. On the next day, run the terminal for an hour each at one quarter, one half then three quarters of mains voltage. After this conditioning, you should be able to slowly bring the terminal to full voltage. The display will usually come to life between half to three quarters voltage.
Terminals with the dual tape drive option will almost certainly have no rubber left on the capstan wheels. The diameter of the wheel when new was 0.338" which is hard to replicate using an o-ring glued on the capstan so the approach we have used with reasonable success is as follows: (1) Remove the tape drives from the terminal, (2) remove the 2 springs that hold the capstan motor in place. (3) pop out the motor from the two 'cups' the motor pivots on (you might break off part of a cup but it doesnt affect the operation) (4) remove the old rubber, cleaning the capstan hub with isopropyl alcohol. (5) Connect the motor to a DC supply and apply about 2 volts to make the capstan rotate fast. (6) Lightly sand the capstan metal to make it smooth. ((7) reduce the voltage to the motor until it runs slowly (about 0.6 volts) and apply coat of metal etch primer, keeping the motor rotating slowly to ensure an even coat and allow to dry. (8) With the motor still rotating slowly, dip the capstan hub in a pool of Plasti-Dip so that the whole hub and part of the shaft has a thick coating. (9) Place the motor on its side and leave it turning slowly for at least 4 hours, preferably overnight. It should dry evenly. (10) Once the Plasti-Dip has dried, cut any excess Plasti-Dip off the top of the capstan hub and if necessary, trim any excess off the shaft. (11) Lightly sand the rubber on the hub using 600 grit sandpapaer. (12) Measure the diamter of the capstan hub with vernier calipers - the correct diameter is 0.338 Inches. (13) If the diameter it too high, keep sanding. If it's too low, repeat steps 5 to 12 until the diameter is correct then replace the motor, springs and the unit into the mainframe. The resulting rubber on the capstan motor works but isn't as tough as the original so may not last that long - but it does work!
Almost all 264X Series terminals have an affliction that looks like "screen mold". These spots are unsightly and can affect the viewability of the screen, but they have no affect on functionality and can be removed fairly easily. The "screen mold" is not actually mold, but a degradation of the gel layer (actually Canada Balsam) that holds a glass cover onto the terminal CRT. When the Canada Balsam degrades, it can turn into a dark brown sticky liquid that drips into the bottom of the terminal and sometimes into the left tape drive, requiring it to be disassembled and cleaned.
A procedure (including photos) for fixing this problem is outlined on the 9835 page. On the ones we have refurbished, we have removed the Canada Balsam layer, cleaned the glass surfaces and then replaced the front glass, held in place by a narrow bead of black silicone rubber around the edge of the monitor. Space the front glass off the CRT glass by short pieces of wire and then remove the wire once the silicone rubber has set.
| Back | More Images | Product Documentation | Category Accessories |
^ TOP©2004 - 2026 BGImages Australia - All Rights Reserved.
The HP Computer Museum and BGImages Australia are not affiliated with HP Inc. or with Hewlett Packard Enterprise. Hewlett Packard and the HP logo are trademarks of HP Inc and Hewlett Packard Enterprise. This website is intended solely for research and education purposes.
